
Excel library
How to Stack Multiple Columns into One Column in Excel Using Formulas?
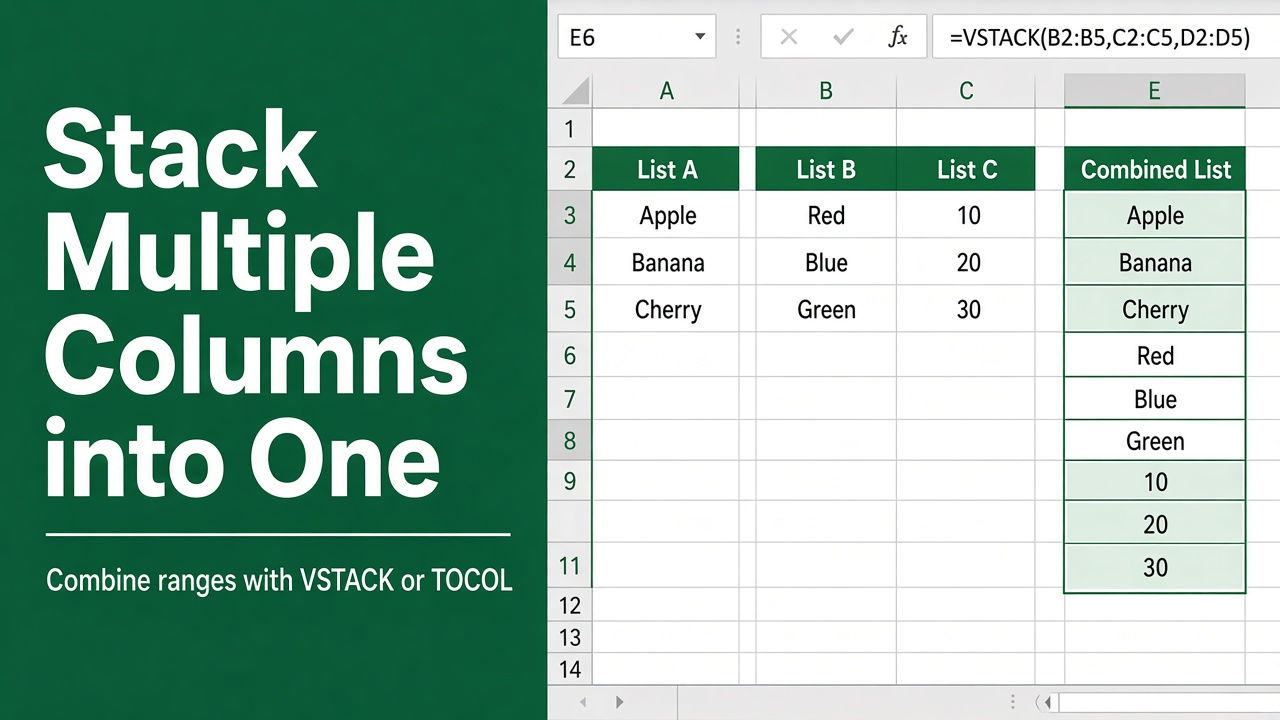
If you have data spread across multiple columns in Microsoft Excel and need to stack or combine it into a single column, there are several methods you can use. This article will show you how to stack multiple columns into one column in Excel using formulas, without having to manually copy and paste the data. By following these steps, you can quickly consolidate your data into a single stacked column, making it easier to analyze, sort, filter, and chart.
In Microsoft 365, one formula does it:
=TOCOL(A2:C10, 1, TRUE)This stacks column A, then B, then C into a single column, skipping blanks, and updates when the data changes. In older versions, use Power Query’s Unpivot Columns or the INDEX formula shown below.
Why Stack Columns in Excel?
There are many reasons why you might need to stack columns in Excel:
- Data consistency: Stacking columns can help ensure your data is in a consistent format, with each variable in its own column. This is especially important if you’re combining data from multiple sources.
- Charting and Pivoting: Many Excel charts and pivot tables require data to be in a stacked format, with each data series in a single column. Stacking your columns can make it easier to create these visualizations.
- Sorting and filtering: With your data in a stacked format, you can easily sort and filter by any variable. This can make it easier to analyze your data and spot trends.
- Saving space: If you have a lot of columns with sparse data, stacking them into a single column can help condense your data and save space in your spreadsheet.
Now let’s look at some methods for stacking columns in Excel.
Using TOCOL to Stack Columns (Microsoft 365)
In Microsoft 365 and Excel 2024, TOCOL turns any block of cells into one column with a single formula. For data in A2:C10:
=TOCOL(A2:C10, 1, TRUE)- The second argument
1skips blank cells. - The third argument
TRUEreads column by column (all of A, then all of B, then C). Leave it out to read row by row instead. - The result spills down and updates whenever the source cells change.
If the columns are in different places, or you want to control the order exactly, list them in VSTACK: =VSTACK(A2:A10, C2:C10, E2:E10).
Formula for Older Versions of Excel
Without TOCOL, use INDEX to walk through the block. Enter this in the first cell of the output column and copy it down until you have 27 rows (3 columns × 9 rows):
=INDEX($A$2:$C$10, MOD(ROWS($1:1)-1, ROWS($A$2:$C$10))+1, INT((ROWS($1:1)-1)/ROWS($A$2:$C$10))+1)ROWS($1:1) counts 1, 2, 3… as the formula is copied down. MOD picks the row within the block and INT picks the column, so the formula returns A2 to A10, then B2 to B10, then C2 to C10.
Why Not TRANSPOSE?
TRANSPOSE only swaps rows and columns: three columns of 9 rows become three rows of 9 columns. It never combines them into one column, so use TOCOL, VSTACK or the INDEX formula instead.
Stacking Columns with Power Query
For a more robust solution that can handle larger datasets and dynamically update when your data changes, you can use Excel’s Power Query feature to stack multiple columns into one. Here’s how:
- Select any cell in your data range.
- Go to the Data tab and click “From Table/Range” to open Power Query editor.
- With your data loaded in Power Query, select the columns you want to stack.
- Go to Transform tab and click “Unpivot Columns”.
- The selected columns will be stacked into two new columns – Attribute and Value. You can rename these columns if desired.
- Click “Close & Load” to load the transformed data back into your Excel sheet.
Power Query is a very versatile tool that makes it easy to shape and transform your data. Stacking columns is just one of many data wrangling tasks you can accomplish with Power Query.
Unpivot Other Columns Option
For more control over which columns get stacked, you can use the Unpivot Other Columns option instead of Unpivot Columns:
- In Power Query editor, select the columns you want to keep (not stack).
- Go to Transform > Unpivot Columns > Unpivot Other Columns.
This will keep the selected columns as is and stack all other columns into the Attribute and Value columns. This allows you to stack most columns while keeping a few key columns in their original form.
Updating Stacked Data
One of the benefits of using Power Query to stack your columns is that your stacked data can be easily refreshed when your source data changes.
After stacking your columns with Power Query, if you add, remove, or change any data in the source columns, simply:
- Go to the Data tab.
- Click “Refresh All” or right-click on the query in the Queries & Connections pane and select Refresh.
Power Query will re-run the unpivot operation and update your stacked column with the latest data. This dynamic refresh ability makes Power Query a great choice for stacking columns in data that changes frequently.
Stacking Columns Using VBA Macro
For the most control and flexibility, you can write a VBA macro to stack columns according to your specific needs. Here’s a sample macro that prompts you to select the columns to stack and outputs them to a new sheet:
Sub StackSelectedColumns()
    Dim ws As Worksheet
    Dim rngCols As Range
    Dim rngData As Range
    Dim outputSheet As Worksheet
    Dim colCount As Integer
    Dim rowCount As Long
    Dim i As Integer, j As Long, k As Long

    Set ws = ActiveSheet

    On Error Resume Next
    Set rngCols = Application.InputBox("Select the columns to stack", "Stack Columns", Type:=8)
    On Error GoTo 0

    If rngCols Is Nothing Then Exit Sub

    colCount = rngCols.Columns.Count
    Set rngData = rngCols.EntireRow
    rowCount = rngData.Rows.Count

    Set outputSheet = Sheets.Add
    outputSheet.Name = "StackedColumns"

    k = 1
    For i = 1 To rowCount
        For j = 1 To colCount
            outputSheet.Cells(k, 1) = rngData.Cells(i, rngCols.Column + j - 1)
            k = k + 1
        Next j
    Next i
End Sub
To use this macro:
- Open the Visual Basic editor (Alt+F11).
- Insert a new module.
- Paste the macro code into the module.
- Return to Excel and run the macro.
The macro will prompt you to select the columns you want to stack. It will then create a new sheet called “StackedColumns” with the data from the selected columns stacked into a single column.
Feel free to modify the macro to suit your specific needs, such as changing the output location or adding headers.
Benefits of Using VBA for Stacking Columns
Using a VBA macro to stack your columns provides several benefits:
- Customization: You can fully customize the stacking process to your liking. Want to include headers? Stack only certain rows? Output the stacked data to a specific location? VBA allows you to program these requirements.
- Automation: Once you’ve written your VBA macro, you can run it with the click of a button. This can save you a lot of time if you need to frequently stack columns.
- Dynamic updates: Like with Power Query, you can write your VBA macro to automatically update the stacked data when the source data changes.
The main downside of VBA is that it requires some programming knowledge. But if you’re comfortable with VBA or willing to learn, it provides the most flexible solution for stacking columns in Excel.
Tips for Stacking Columns in Excel
- Use a unique identifier: If your data has a unique ID or key in each row, make sure to include that column when stacking so you can easily trace each stacked value back to its original row.
- Add headers: Consider adding a header row to your stacked column that indicates what the original column names were. This can make it easier to understand the stacked data.
- Split stacked column: Once you have your data stacked into a single column, you can easily split it back out to multiple columns using the Text to Columns feature on the Data tab.
- Reorder stacked data: After stacking, you may want to sort or rearrange your data. Use the Sort feature on the Data tab to quickly reorder your stacked data by any column.
- Use a table: If your data is in an Excel table (Insert > Table), any formulas or macros you use to stack columns will automatically expand to include new data added to the table.
- Handle errors: When writing formulas or VBA code to stack columns, consider how to handle errors, such as #N/A or #DIV/0! errors, that may appear in your data. You may want to use functions like IFERROR to suppress these errors in your stacked column.
Final Thoughts
Stacking multiple columns into a single column is a common data transformation task in Excel. Whether you use the TOCOL formula, Power Query’s Unpivot feature, or a custom VBA macro, there are several ways to accomplish this quickly and easily.
Each method has its strengths and weaknesses:
- TOCOL and VSTACK are the quickest in Microsoft 365, and the INDEX formula works in any version.
- Power Query can handle larger datasets and dynamically update but requires some knowledge of the Power Query editor.
- VBA provides the most customization and automation but requires programming skills.
Consider your data size, update frequency, and personal Excel skills when choosing a method.
FAQs
What is the easiest way to stack multiple columns into one column in Excel?
In Microsoft 365, use =TOCOL(A2:C10, 1, TRUE): it stacks the columns one after another into a single column and skips blanks. In older versions, use Power Query’s Unpivot Columns or the INDEX formula in this article.
Can I stack columns in Excel without using formulas?
Yes, you can stack columns in Excel without using formulas by using Power Query. Select any cell in your data range, go to the Data tab, click “From Table/Range” to open Power Query editor, select the columns you want to stack, go to the Transform tab, and click “Unpivot Columns”.
How can I customize the stacking of columns in Excel?
To customize the stacking of columns in Excel, you can use a VBA macro. This allows you to specify which columns to stack, where to output the stacked data, add headers, and more. You’ll need to have some knowledge of VBA programming to create a macro.
Will the stacked data update automatically if I change the original data?
Yes, if you use a formula. TOCOL, VSTACK and the INDEX formula recalculate as soon as the source changes. Power Query updates when you click Refresh, and a VBA macro only when you run it again.
What are some best practices for stacking columns in Excel?
Some best practices for stacking columns in Excel include using a unique identifier column to trace stacked values back to their original rows, adding headers to indicate the original column names, using a table format for your original data so formulas and macros automatically expand to new data, and handling potential errors in your formulas or macros.